Animated CGI hand
👋🏻
I’ve spent the last few weeks working out how to make this simple 3D animation in Blender. It’s been a fiddly process, so I thought I’d share what I learned.
The very first time I opened Blender on my laptop I couldn’t tell how to select an object, or rotate the view, or do much of anything at all. I’d never been so confused by a program before, and so went looking for help. I found it in this nine part tutorial series by Andrew Price. During five engaging hours he walks through the creation of a 3D donut and coffee cup, cleverly covering everything a new Blender user could need to know.
I was especially interested to learn that many basic tasks in Blender are performed using a three-button mouse and a dedicated keyboard number pad. I had neither of those things, so following his advice I changed Blender’s UI settings to work with my laptop trackpad and keyboard. This cleared up my earlier confusion, and meant I could now select objects, change views, zoom in and out, and so on.
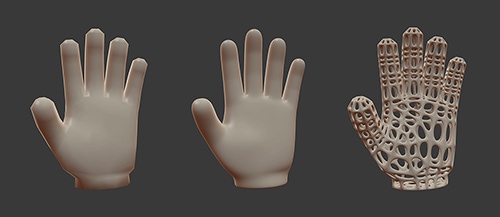
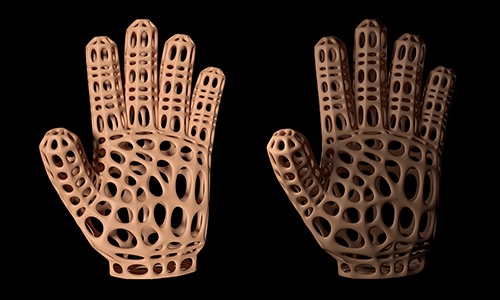
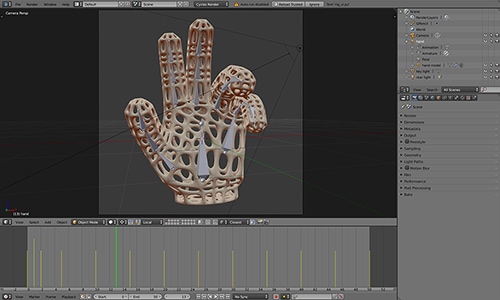
After five hours of making 🍩🍩 and ☕️ with Andrew, I returned to my task of getting a hand to wave hello. I bought this hand model, downloaded the .obj file, and loaded it into Blender. Applying a subsurf modifier added in smooth detail, and a wireframe modifier gave it that strange webbed look.
I then followed Andrew’s guide to positioning cameras and lights, changing the stark lighting in my scene to something more subtle.
When it came time to rig the hand with bones and animate it, I followed this video. It’s long, but thorough, so stick with it.
With the model complete I was finally ready to render the animation. Andrew offers suggestions for speeding this process up, and in my case that meant:
- Setting the Tile size to 16 × 16 (best for CPU rendering).
- Setting my Light Path Bounces to 1 min and 4 max.
- Turning off Reflective and Refractive Caustics.
- Turning on Denoising.
After quite a bit of testing I output all 51 frames at 200% size and 800 samples, saving them as 2,400px × 2,400px JPEGs. Each frame took 33 minutes to render, for a total of about 28 hours. Yes, 28 hours. I didn’t mind the wait, but if time had been a real problem I could have paid blendergrid $35 to render the whole thing for me in just two hours.
Next I needed to combine those 51 JPEGs into a single MP4 video. To do that I used a powerful piece of encoding software called FFmpeg. The default FFmpeg installation instructions are really confusing, so I first installed a package manager called Homebrew, then told Homebrew to install FFmepg using the terminal command brew install ffmpeg.
I then navigated to the folder containing the JPEGs and told FFmpeg to create an MP4 video using ffmpeg -framerate 24 -i %04d.jpg -preset veryslow -crf 18 hand.mp4. Here’s what each part of that command means:
ffmpeg— hey, ffriend-framerate 24— I want 24 frames per second-i %04d.jpg— using input files with the naming pattern 0000.jpg, 0001.jpg, etc-preset veryslow— take it slow, get it right-crf 18— set the quality to be visually losslesshand.mp4— save the video with this name and file type
The result of which was a 1.6MB MP4 that looked great and was way smaller than anything I could get Photoshop or Quicktime to export.
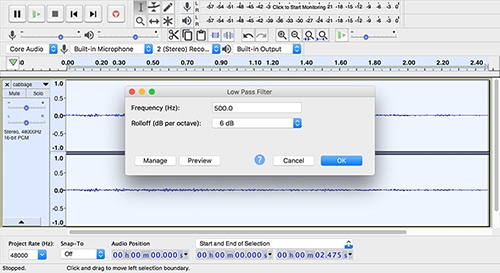
The final touch would be a subtle rubbery squeak to accompany the movement of the fingers. I tried extracting such sounds from a variety of household items – kitchen gloves, exercise bands, Crocs, etc – but nothing worked very well. Eventually I turned to the internet and found this sample of a man pulling apart a moist red cabbage.
I loaded that .wav file into the free audio editor Audacity, and trimmed it down to the 2.5 seconds I was interested in. I then applied a Bass and Treble filter and a Low Pass filter to reduce the crunchiness and make it sound more rubbery.
I exported that as a .wav file, and used this command to add it to the video: ffmpeg -i hand.mp4 -i soundeffect.wav -shortest -map 0:v -map 1:a -vcodec copy -acodec aac hand_with_soundeffect.mp4.
ffmpeg— hello again-i hand.mp4— take this video-i soundeffect.wav— and this audio-shortest— trim the longer of the two (audio) down to match the shorter one (video)-map 0:v— take the first (0) input’s video (v)-map 1:a— take the second (1) input’s audio (a)-vcodec copy— use the video as it is-acodec aac— but re-encode the audio as AAChand_with_soundeffect.mp4— save the combined result with this name and file type
And there we are. All done. I’m afraid I can’t supply my finished .blend file because the hand model I used isn’t mine to give away. However, if this piqued your interest in Blender be sure to watch the many tutorials Andrew has on his Blender Guru site and on his YouTube channel. All the ones I’ve watched so far have been enormously helpful.